Steak in the Oven: Reverse Sear vs. Traditional Baking Techniques
About Misen
We make kitchen tools that work better, last longer, and cost less than you’d expect: everyday innovations with a radical focus on our customers’ actual need.
Table of Contents
Summary
Master the art of steak perfection by understanding when to choose the revolutionary reverse sear method versus the time-tested traditional bake. This comprehensive guide reveals how reverse searing transforms thick cuts into tender, edge-to-edge masterpieces through low-temperature cooking that activates natural enzymes, eliminates gray bands, and creates an unparalleled crust—though it requires patience and steaks at least 1.5 inches thick. For weeknight dinners or thinner cuts, the traditional method of searing first then finishing in the oven delivers restaurant-quality results in half the time, with more predictable timing and fewer dishes. You'll discover the science behind why reverse searing preserves moisture better while developing deeper umami flavors, learn the critical temperature checkpoints that prevent overcooking, and understand why a reliable meat thermometer trumps the outdated finger test every time. Whether you're seeking the ultimate special-occasion steak with perfect edge-to-edge color or need a foolproof method for quick Tuesday night dinners, this article equips you with step-by-step techniques, timing guidelines, and pro tips that eliminate guesswork and ensure juicy, flavorful results every single time.
Reverse Sear Explained – a Modern Oven Technique
By slow-roasting thick steaks at 250-275°F until they sit 30°F below target, you unleash natural enzymes that tenderize the meat, evaporate surface moisture for a flawless sear, and erase the gray band—delivering edge-to-edge color and juicier texture you can’t achieve with traditional high-heat methods.
Low‑Temperature Roast Before the Sear
The reverse sear method begins with gently cooking your steak in a low-temperature oven, typically at 250-275°F (120-135°C) [1][2]. This initial slow-cooking stage is what separates reverse searing from traditional methods and creates several distinct advantages. Unlike high-heat cooking, this low-temperature approach gradually warms the meat, activating natural cathepsin enzymes that break down proteins and tenderize the steak [1][2]. These enzymes work most effectively as the meat slowly approaches 122°F (50°C), after which they become inactive [2].
The extended time below this threshold maximizes natural tenderization without intervention. Beyond improving texture, slow roasting evaporates surface moisture from the steak, creating ideal conditions for superior browning when searing later [2]. This drier exterior will caramelize quickly without steaming. For timing, thick steaks (1½-2 inches) typically need 15-30 minutes in the oven, depending on size and desired doneness [1][3].
Remove the steak when its internal temperature is approximately 30°F below your final target temperature, as both carryover cooking and the final sear will raise the temperature further [1][3]. This precise temperature control eliminates the gray, overcooked band typical of conventionally cooked steaks [3].
How Temperature Affects Flavor and Texture
Temperature control fundamentally transforms both flavor and texture during the reverse sear process. During the initial low-temperature phase (250-275°F), natural cathepsin enzymes remain active as the meat slowly approaches 122°F, gently breaking down proteins and enhancing tenderness without manual intervention [4]. This slow cooking reduces hardness, chewiness, and gumminess while preserving more moisture—reverse-seared steaks show lower cooking loss and higher water content than traditionally cooked steaks [4].
The gradual heating also allows heat to penetrate evenly, eliminating the overcooked gray band common in conventional cooking methods [5]. For flavor development, low-temperature cooking increases key amino acids like glutamic acid that contribute to umami taste, while preserving beneficial fatty acids [4]. When the steak moves to the searing stage, surface temperatures exceeding 350°F trigger the Maillard reaction—a complex chemical process where proteins and sugars interact to create hundreds of unique flavor compounds [6].
This reaction begins slowly at 250°F but accelerates dramatically at 350°F, creating the rich, caramelized exterior crust that balances the tender interior [6]. The dry surface achieved during the low-temperature phase enables faster, more effective browning during the final sear, as moisture must evaporate before the Maillard reaction can occur [6].
Why the Reverse Sear Yields a Uniform Crust
The reverse sear excels at creating an even, uniform crust through precise moisture and temperature control. In traditional cooking, high heat creates a temperature gap where the exterior cooks exponentially faster than the interior—leading to either a weak crust or an overcooked band beneath the surface [7]. Reverse searing fundamentally changes this equation.
The initial low-temperature phase evaporates surface moisture, creating an ideal dry exterior for browning [7]. This evaporation is crucial because moisture must be eliminated before the Maillard reaction—the chemical process that creates hundreds of flavor compounds—can occur effectively [7]. By the time your steak reaches the searing stage, its surface has already shed excess moisture, allowing for immediate, efficient browning rather than steaming.
The two-step process also matches the rate of external browning with internal heat conduction, eliminating the gray overdone layers typical in conventionally cooked steaks [8]. This consistent edge-to-edge doneness occurs because you're searing meat that's already reached its desired internal temperature, so the exterior develops a rich crust without pushing the interior beyond your target doneness [8]. The result is a steak with perfect edge-to-edge color and a thin, intensely flavored crust that's uniformly caramelized.
Tools That Make the Reverse Sear Reliable
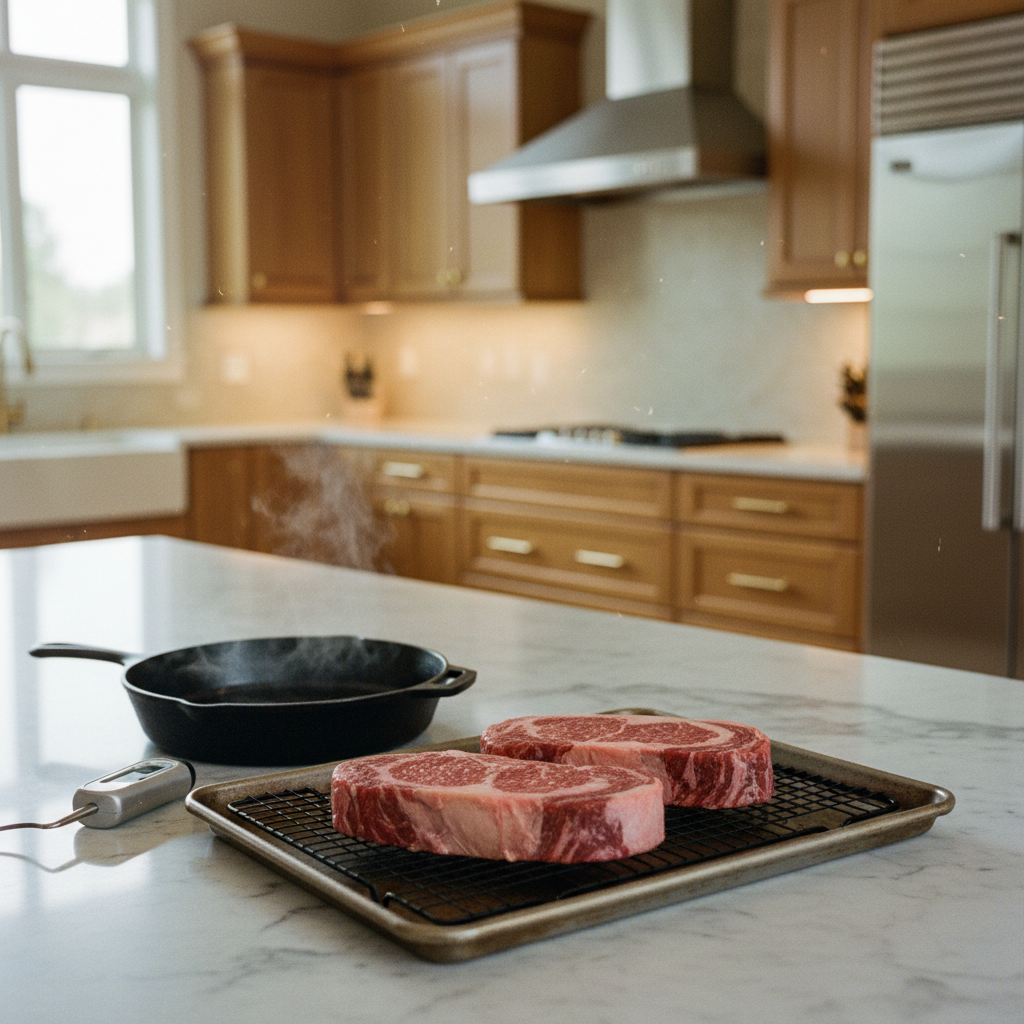
The reverse sear method requires minimal but specific tools to achieve consistently perfect results. A reliable meat thermometer tops the list—not the traditional palm test, which lacks precision when just a few degrees separate rare from medium [9]. Instant-read thermometers like Thermapen take measurements from the thin probe tip, minimizing heat loss and avoiding large probe marks [9]. For continuous monitoring, a dual-channel thermometer that tracks both air and meat temperatures simultaneously ensures precise cooking without constantly opening the oven [10].
Your cooking setup needs a sheet pan with a wire rack or cooling rack to elevate the steak, allowing air to circulate evenly around the meat [3]. Place parchment paper underneath for easier cleanup [3]. For the searing phase, a heavy cast iron pan retains heat effectively, though any frying pan works when paired with the right combination of oil and butter for browning without burning [3]. The most important requirement isn't equipment but steak thickness—reverse searing only works on cuts at least 1.
5 inches thick, as thinner steaks overcook easily during the searing phase [9][3]. This versatile technique works across various cooking methods—oven, smoker, sous vide for the low-temperature phase, followed by cast iron, grill, or even torch for the sear [9].
Traditional Oven Baking – the Classic Method
Master the restaurant-proven technique: sear your steak in a smoking-hot cast iron skillet for 2-3 minutes per side, then slide the entire pan into a 375°F oven with a pat of butter to finish cooking—delivering perfect browning and tender results in under 15 minutes.
High‑Heat Sear First, Then Finish in the Oven
You'll start the traditional method with an intense stovetop sear before finishing in the oven. This classic approach—searing over high heat, then transferring to a moderate oven—has been the restaurant standard for decades [9]. Start by preheating your oven to 375°F while heating oil in your cast iron skillet until it just begins to smoke.
Add your steak and sear each side for two to three minutes without disturbing until browned [12]. Once you've developed a crust, transfer the entire skillet to the oven with a tablespoon of butter to finish cooking to your target internal temperature [12]. While conventional wisdom once claimed that searing "locks in juices," food science has disproven this myth—your high-heat start creates flavor compounds through the Maillard reaction while the gentler oven heat prevents burning [11].
This method yields good browning (ranking third in comparative tests) and relatively tender results, though with a more pronounced temperature gradient from edge to center than reverse-seared steaks [12]. The traditional approach excels in efficiency, taking significantly less time than reverse sear or sous vide methods—making it ideal when you need a delicious steak without extended preparation [12]. However, transferring a screaming-hot skillet mid-cook can be awkward and requires careful attention to avoid overcooking during the oven phase [12].
Managing Oven Broil vs Bake Settings
Understanding your oven's broil and bake settings helps you achieve perfect results. When you bake at moderate temperatures (typically 350°F), both top and bottom heating elements create even, all-around heat that cooks your steak gradually from outside in [13][14]. When you broil, you're applying intense direct heat (500-550°F) from only the top element, mimicking grilling's high heat [15]. Your rack position makes a significant difference with either method.
For broiling, position your rack as close to the heat source as possible—usually the top slot—for quick searing and browning [15]. For baking, use the center rack to ensure even heat distribution around your steak [15]. These settings work beautifully together: baking browns your steak gradually while maintaining moisture, then a brief broil finish creates that restaurant-quality caramelized crust without overcooking the interior [13]. For thick steaks, start by baking at 375°F until you approach your target doneness, then switch to broil for final crisping [14].
Electric and convection ovens typically produce drier heat than gas models, making them particularly effective for broiling's intense searing action [15]. Remember that broiling requires constant attention as food can quickly go from perfectly browned to burnt under such high heat [13].
When the Classic Method Shines
While reverse searing produces exceptional results for thick cuts, you'll find the traditional method superior in several scenarios. Time is the most compelling factor—when you sear first and finish in the oven, you'll have dinner ready significantly faster than with reverse searing [16]. When you need dinner on the table quickly, this method delivers quality results without the wait.
You'll also get better results with thinner steaks under 1. 5 inches thick, which would overcook easily during a reverse sear's final high-heat stage [16]. Traditional searing offers more predictable timing—you can better estimate when your steak will be ready, making it easier to coordinate with side dishes [16].
You'll also have more real-time control, adjusting heat as needed throughout cooking rather than committing to a predetermined temperature path [16]. For practical considerations, you'll often use fewer dishes with the classic method—just one oven-safe skillet from stovetop to oven [16]. If you're new to cooking steak, you might find this traditional approach less intimidating with its straightforward technique that mirrors how most of us first learned to cook steak [16].
Common Pitfalls and How to Avoid Them
Relying on the touch test instead of a meat thermometer remains the most common mistake. The finger method (comparing steak firmness to your palm) gives inconsistent results, while a reliable thermometer ensures you hit your target doneness every time [12]. Neglecting carry-over cooking leads to overcooked steak—remove your meat 15-20 degrees below target temperature, as residual heat continues the cooking during rest [17].
Skipping room temperature prep causes uneven cooking (as we discuss in the reverse sear section)—give your steaks 45 minutes on the counter for relaxed muscles and better heat distribution [12]. Using forks for turning creates tiny holes that leak precious juices—use tongs instead, avoiding plastic ones that melt under high heat [17]. When transferring from stovetop to oven, be careful with the screaming-hot skillet to prevent burns.
Finally, achieving proper sear before the interior overcooks challenges many cooks—the sudden temperature change causes meat to seize up, creating that telltale gray band beneath the surface [18]. Combat this by ensuring your skillet reaches smoking temperature before adding your steak, and focus on developing color quickly rather than cooking through during the searing phase [17].
Step‑By‑Step: Perfect Reverse Sear Steak in the Oven
Dry-brine thick steaks overnight, slow-roast at 250°F until 10-15°F below your target doneness, then sear in a screaming-hot skillet—no resting required for edge-to-edge perfection.
Preparing the Steak: Seasoning and Room Temperature
Start with thick steaks—as covered earlier, the reverse sear requires cuts at least 1. 5 inches thick. Season generously with kosher salt and freshly ground pepper on all sides [11].
For the best crust, place your seasoned steak on a wire rack over a baking sheet and refrigerate uncovered overnight [11]. This dry-brining technique draws out surface moisture, creating the perfect conditions for browning. Before cooking, let the steak rest at room temperature for 45 minutes [11].
This simple step helps the meat cook more evenly and prevents that disappointing gray band you see in traditionally cooked steaks.
Setting the Oven and Monitoring Internal Temperature
Set your oven to the low temperature range discussed earlier—between 200°F and 275°F [11]. A reliable meat thermometer is your most important tool here.
Skip the outdated touch tests and insert the thermometer horizontally into the steak's center [19][9]. Remove your steak when it reaches these internal temperatures [11]: - Rare: 105°F - Medium-rare: 115°F - Medium: 125°F - Medium-well: 135°F These targets are 10-15°F below your final goal since the searing step will continue cooking the meat.
Expect 20-25 minutes for rare and 30-35 minutes for medium when cooking a 1½-inch steak at 250°F [11]. Wireless thermometers work particularly well here—they let you monitor progress without constantly opening the oven and losing heat [19].
Searing for a Caramelized Crust
Now for the moment that makes the reverse sear special—creating that perfect crust.
Your steak's surface has dried during the low-temperature phase, setting up ideal browning conditions [11].
Heat a heavy skillet over high heat until screaming hot, about 1-2 minutes [3].
Resting the Steak for Maximum Juiciness
Here's where reverse searing breaks from tradition—you can skip the resting step entirely. While conventional cooking methods require a 5-10 minute rest to redistribute juices, reverse-seared steaks have already achieved this through their gentle cooking process [22].
If you prefer following traditional practices, a brief 5-minute rest won't hurt. Any escaped juices can simply be poured back over the sliced steak [21].
For those who miss the crispy crust after resting, a quick 15-second re-sear brings it right back [21]. The choice is yours, but know that with reverse searing, you've already done the work to ensure a juicy, evenly cooked steak from edge to edge.
Step‑By‑Step: Traditional Baked Steak in the Oven
Master the classic steakhouse method: sear your 1.5-inch steak in a screaming-hot cast-iron pan, then slide it into a 450°F oven for 10-12 minutes until your thermometer hits 130-135°F for perfect medium-rare.
Seasoning and Pre‑Searing the Steak
Let's walk through the traditional method that's been a go-to for home cooks and restaurants alike. This technique flips the script on reverse searing—you'll start with intense heat for that gorgeous crust, then finish gently in the oven [9].
First, bring your steak to room temperature (about 45 minutes on the counter) and make sure it's at least 1. 5 inches thick—thinner cuts can overcook before you know it [9].
Season generously with kosher salt and freshly ground pepper, giving the salt time to work its magic into the meat. Now for the searing: Get your heavy-bottomed pan screaming hot.
Choosing the Right Oven Rack and Pan
Setting up your oven properly makes all the difference. For the traditional method, position your rack right in the middle—this sweet spot gives you balanced heat from both top and bottom elements for even cooking [23]. Your pan choice matters just as much as rack placement.
A heavy cast iron skillet is the classic choice because it holds heat like a champ, maintaining those high temperatures even when you add the cold steak [12][9]. That said, any heavy-bottomed, oven-safe pan will work—the key is avoiding thin pans that create hot spots and uneven cooking [12]. Pro tip: If you're using the traditional method but want to finish with a quick broil for extra crust (as covered in the previous section), slide your rack up to the top third of the oven for those final moments [23].
This puts your steak close to the upper heating element for concentrated browning power.
Finishing the Steak to Target Doneness
After transferring your seared steak to a 450°F oven, timing becomes everything. Here's what to expect: medium rare (130-135°F) usually takes 10-12 minutes, medium (140-150°F) needs 12-15 minutes, and well done (160°F+) requires 15-18 minutes [24]. Your best friend here? A digital thermometer inserted into the thickest part of the steak.
Don't rely on timing alone or the old "palm test"—when just a few degrees make the difference between perfect and overcooked, accuracy counts [25][26]. The beauty of the traditional method is that you stay in control. Check your steak's progress halfway through and adjust if needed [24]. Remember to pull it from the oven about 5°F below your target temperature—carryover cooking will take it the rest of the way [26].
Visual cues can help too: medium rare shows a warm red to dark pink center with slight give when pressed, while medium displays pink throughout with a firmer feel [25][26]. Working with a thicker cut? Drop your oven to 400°F to keep the outside from overcooking while the center catches up [24].
Rest and Slice for Best Texture
The final steps—resting and slicing—can make or break your perfectly cooked steak. Here's why patience pays off: when you cook steak, heat pushes juices toward the surface. Cut too soon, and those flavorful juices end up on your plate instead of in your mouth [27]. Give your steak time to relax: 5-7 minutes for thinner cuts, 10-15 minutes for thick steaks [28][29].
During this rest, the muscle fibers loosen up and reabsorb moisture throughout the meat [29]. Tent it loosely with foil—you want to keep it warm without trapping steam that'll soften your beautiful crust [29]. Now for the slicing secret that makes every bite tender: Look closely at your steak and find the direction of the muscle fibers (the "grain"). Position your knife perpendicular to these fibers and slice against them [29].
This shortens the muscle strands, transforming even a chewier cut into something wonderfully tender. This slicing technique is especially crucial for traditionally cooked steaks—since the high-heat-first method creates more variation between the outer and inner portions, proper slicing helps even out any texture differences [27].
Key Takeaways
- Reverse sear uses 250-275°F oven until 30°F below target, then sear for edge-to-edge doneness.
- Cathepsin enzymes active below 122°F naturally tenderize steak during low-temperature phase.
- Dry surface from slow roast enables faster Maillard browning when searing at 350°F+.
- Use steaks ≥1.5 in thick; thinner cuts overcook during reverse sear's final high-heat step.
- Traditional method: sear first in hot skillet, finish in 375°F oven for faster weeknight cooking.
- Pull steak 5-15°F before target temp to account for carryover cooking during rest.
- Skip resting reverse-seared steaks; gentle cooking already redistributed juices internally.
References
- https://www.jessicagavin.com/how-to-reverse-sear-a-steak/
- https://www.saltsearsavor.com/blog/reverse-sear-steak
- https://cookthestory.com/reverse-sear-steaks-perfectly/
- https://pmc.ncbi.nlm.nih.gov/articles/PMC9317986/
- https://www.creeksidebbq.com/mastering-the-art-of-reverse-searing-for-juicy-tender-meats/
- https://blog.thermoworks.com/thermal-tips-sear-meat/
- https://www.primermagazine.com/2020/learn/how-to-reverse-sear-steak
- https://roguecookers.com/why-is-the-best-method-for-cooking-steak-reverse-searing/
- https://jesspryles.com/how-to-cook-a-steak-with-reverse-sear-method/
- https://blog.thermoworks.com/ribeye-steaks-smoked-reverse-seared/
- https://www.seriouseats.com/reverse-seared-steak-recipe
- https://food52.com/story/24417-how-to-cook-steak
- https://www.marthastewart.com/broil-vs-bake-7570628
- https://www.maytag.com/blog/kitchen/bake-vs-roast-vs-broil.html
- https://www.kitchenaid.com/pinch-of-help/major-appliances/bake-vs-roast-vs-broil.html
- https://www.reddit.com/r/Cooking/comments/1fuub44/whats_the_point_of_reversesearing_compared_to/
- https://www.allenbrothers.com/article/how-to-cook-a-perfect-steak-in-the-oven/bg0010?srsltid=AfmBOornpIxxz6poDUNmLsnT9rlmI4my-vQFYwdz4YiGTFPmTEjIvA-W
- https://www.cnet.com/home/kitchen-and-household/youre-cooking-steak-the-hard-way-reverse-searing-makes-it-foolproof/
- https://inkbird.com/blogs/recipes/how-to-reverse-sear-steak
- https://www.seriouseats.com/how-to-have-juicy-meats-steaks-the-food-lab-the-importance-of-resting-grilling
- https://amazingribs.com/more-technique-and-science/more-cooking-science/science-of-resting-meat/
- https://hinesmeat.com/blogs/hines-blog/seariously-juicy-mastering-the-reverse-sear-for-perfect-medium-rare-steak
- https://www.whirlpool.com/blog/kitchen/oven-rack-placement.html
- https://www.iheartnaptime.net/how-to-cook-steak-in-the-oven/
- https://www.sullivanssteakhouse.com/steak-temperature-guide/
- https://heygrillhey.com/steak-temperature-guide/
- https://www.delish.com/cooking/recipe-ideas/a21566115/how-to-cook-steak-in-the-oven/
- https://www.webstaurantstore.com/blog/2962/letting-meat-rest.html?srsltid=AfmBOopincs5Z4H3FdEWWPvxyBRkSYiGfxi6IhgwtI7K0PRZyktOCKf4
- https://www.carolinacattlecompany.com/blogs/all-blog-post/properly-rest-and-slice-beef-steaks-the-key-to-juicy-tender-perfection